I've made a few sculpting tools for sale. If you are interested in that you'll find more infos after the break.
Tuesday, March 17, 2015

Monday, March 16, 2015
Sticky: Free Ebook Download
I've merged all tutorials from this blog into an ebook that you can download for free. You'll find the download-links after the break.
Sunday, September 22, 2013
some tools ready to be shipped to a customer
Hi, I just want to share a few pictures showing the boxing of some tools for a customer from the US (greetings to Alabama). I use a DVD-sized box for packaging and small acrylic tubes with plugs for the tool tips.


Saturday, September 21, 2013
ebook updated and two miniatures
I have just updated the free downloadable ebook about making sculpting tools with all my tutorials from this blog. Here is the link.
Without any photos this post might be a little bit boring, so I post here pictures of my latest miniatures.
These are characters from the books of the German author Walter Moers.
The one that looks like a lizard man is called "Hildegunst von Mythenmetz" and the little one-eyed guy is a bookling (in German: "Buchling) and is called "Danzelot von Silbendrechsler". I hope you like them.
Without any photos this post might be a little bit boring, so I post here pictures of my latest miniatures.
These are characters from the books of the German author Walter Moers.
The one that looks like a lizard man is called "Hildegunst von Mythenmetz" and the little one-eyed guy is a bookling (in German: "Buchling) and is called "Danzelot von Silbendrechsler". I hope you like them.
 |
| Hildegunst von Mythenmetz |
 |
| Danzelot von Silbendrechsler |
Thursday, July 11, 2013
Storing solution for w.i.p. polymer clay sculptings

Welcome back for a new tutorial.
This time I'd like to present an idea about storing unfinished miniatures to keep them safe between the sculpting sessions.
This time I'd like to present an idea about storing unfinished miniatures to keep them safe between the sculpting sessions.
Usually I've done my sculpting with two part epoxy putties like greenstuff and Procreate, but lately I've tried my hands more and more on polymer clays that have to be baked in the oven to get hard.
Especially since the BeeSPutty produced by Stefan Niehues is out (see my last post) I'm doing my stuff with this polymer clay.
The biggest advantage (at least for me) of polymer clay is the fact that unlike the epoxy putties (greenstuff/Procreate) it won't get hard and stays workable until you bake it in the oven.
But this advantage is also a disadvantage or at least it could be. Because the clay stays soft, you have to be very careful not to ruin all your sculpting work by accidentally squashing the miniature.
Especially between the sculpting sessions, you have to be sure to store the work-in-progress miniatures in a save place where they won't be accidentally damaged.
But this advantage is also a disadvantage or at least it could be. Because the clay stays soft, you have to be very careful not to ruin all your sculpting work by accidentally squashing the miniature.
Especially between the sculpting sessions, you have to be sure to store the work-in-progress miniatures in a save place where they won't be accidentally damaged.
Thursday, May 30, 2013
BeeSPutty - a new sculpting putty on the rise
This post might be slightly off topic because it is not about sculpting tools but about sculpting putty.
Nevertheless I'd like to bring to your attention the arrival of a brand new sculpting material called BeeSPutty that is available since yesterday.
BeeSPutty is a one-component bake-able sculpting putty. The guy who develloped this putty is Stefan Niehues, a professional sculptor who has quite a lot experience in all kind of sculpting, especially sculpting miniatures.
I had the chance to grab a test batch of this putty and I'm very happy with it. Usually I worked with a two-part epoxy putty, like greenstuff or procreate, but I don't like the stress you have to get your sculpting done during the curing time of the putty. So lately I tried out bake-able putties like Fimo and super sculpey firm grey. The advantage is that you can works as slow or fast as you want as the putty only hardens when you put it in your oven. That's more my sculpting style because I'm quite slow (to be honest) and while having a little daughter, there are a lot of not-planed interruptions when I do my sculpting. If this occur, greenstuff is lost as it will harden while playing with my daughter but not so bake-able clay. You can just put it aside and go on with sculpting later.
Fimo and SS firm grey are not bad, but as far as I've tested it, BeeSPutty is even better. It has quite a wax-like-feeling and you can get sharp edges quite easily with this putty that also blend perfectly. I just have to go on with my testing, but it is very promising.
So if you want to know more about this putty, head over to www.masqmini.com where you will find more informations and also some videos about sculpting with BeeSPutty. There you can also order the putty.
Nevertheless I'd like to bring to your attention the arrival of a brand new sculpting material called BeeSPutty that is available since yesterday.
BeeSPutty is a one-component bake-able sculpting putty. The guy who develloped this putty is Stefan Niehues, a professional sculptor who has quite a lot experience in all kind of sculpting, especially sculpting miniatures.
 |
| BeeSPutty |
As BeeSPutty is a a bake-able putty, it is similar to Fimo and super sculpey in some ways, but it has some unique features. Just to mention one, you don't need a greenstuff foundation on a wire armature if you want to sculpt miniatures with BeeSPutty. And you can sculpt 30mm miniatures as well as larger things like busts etc.
Fimo and SS firm grey are not bad, but as far as I've tested it, BeeSPutty is even better. It has quite a wax-like-feeling and you can get sharp edges quite easily with this putty that also blend perfectly. I just have to go on with my testing, but it is very promising.
So if you want to know more about this putty, head over to www.masqmini.com where you will find more informations and also some videos about sculpting with BeeSPutty. There you can also order the putty.
Monday, March 18, 2013
Hexagonal Aluminum Handles
Hi,
today I just want to share a little idea about tool-handles, I came across lately. In a hardware store I found hexagonal aluminum rods in the size of a classical wooden pencil and I thought, these would make some nice tool handles. The wrench size of these rods is 7.0 mm. So I cut off pieces with a length of 10-11 cm from these aluminum rods like you can see on the following picture.

Then I drilled an axial hole on each side. In fact I made three versions with holes in 1.0 mm, 2.0 mm and 3.0 mm size for holding 1mm, 2mm and 3mm tool tips like you can see on the following picture. I confess it is not easy to get the holes exactly centered. After that I drilled in small holes with a diameter of 2.5 mm in at a 90 degree angle to the first hole and about 0.5 cm from the end of the rod. In this holes I cut threads with a m3 size, so headless set screws with m3 size will fit in.
These set screws will fix the tool tips inside the handle. Of course you don't need the whole side-holes-and-set-screw thing. Instead of that you just can glue the tool tip inside the axial holes with metal glue, but I prefer the set screw solution because it gives me the option to change the tool tips and to adjust the length of the tool tips.
Finally I bevel the ends of the tool handles because I don't like these hard edges on my tools, but this is more an aesthetical aspect then a technical need. I do this by fixing the rod into an electric drill set it into rotation and carefully grind it down with an electric file or a usual metal file.
Finally the whole thing looks like that:


What you can do at last is to give the handles a nice and smooth surface by using fine grinding paper and a polishing wheel (I still have to do that).
Ah, I nearly forgot to point out a main advantage of this tool beside the fact that it feels like a pencil. It didn't accidentally roll from your desk because of the hexagonal shape and this is a big point, especially if you use small and delicate tools that could easily be damaged.
So I hope you like this idea. See you next time.
today I just want to share a little idea about tool-handles, I came across lately. In a hardware store I found hexagonal aluminum rods in the size of a classical wooden pencil and I thought, these would make some nice tool handles. The wrench size of these rods is 7.0 mm. So I cut off pieces with a length of 10-11 cm from these aluminum rods like you can see on the following picture.

Then I drilled an axial hole on each side. In fact I made three versions with holes in 1.0 mm, 2.0 mm and 3.0 mm size for holding 1mm, 2mm and 3mm tool tips like you can see on the following picture. I confess it is not easy to get the holes exactly centered. After that I drilled in small holes with a diameter of 2.5 mm in at a 90 degree angle to the first hole and about 0.5 cm from the end of the rod. In this holes I cut threads with a m3 size, so headless set screws with m3 size will fit in.
These set screws will fix the tool tips inside the handle. Of course you don't need the whole side-holes-and-set-screw thing. Instead of that you just can glue the tool tip inside the axial holes with metal glue, but I prefer the set screw solution because it gives me the option to change the tool tips and to adjust the length of the tool tips.
Finally I bevel the ends of the tool handles because I don't like these hard edges on my tools, but this is more an aesthetical aspect then a technical need. I do this by fixing the rod into an electric drill set it into rotation and carefully grind it down with an electric file or a usual metal file.
Finally the whole thing looks like that:


What you can do at last is to give the handles a nice and smooth surface by using fine grinding paper and a polishing wheel (I still have to do that).
Ah, I nearly forgot to point out a main advantage of this tool beside the fact that it feels like a pencil. It didn't accidentally roll from your desk because of the hexagonal shape and this is a big point, especially if you use small and delicate tools that could easily be damaged.
So I hope you like this idea. See you next time.
Sunday, March 17, 2013
A simpler way to make the Schellert-Tool Handle
Hi, I just want to share a much simpler way to do the Schellert-Tool handle.
To remember: The "Schellert-Tool" is a tool tip holder with exchangeable sculpting tool tips.
The sculpting tool tips are fixed into aluminum clamps that are taken from hobby knifes to form the endparts of the Schellert-Tool handle. You can find an in deep explanation about building the Schellert-Tool here (link).
I confess, it's not the simplest tool to build. Especially cutting the threads into an aluminum tube might be challenging even if you own the needed thread cutter and impossible, if you haven't one. So I thought about a way to make this tool easier to build. The easiest way would be to find somewhere an already cut thread-piece that could be used for that. But I had no luck in finding such a pre-fabricated piece untill lately:
Now I've found in a hardware store a simple and cheap piece that is ideal for my needs. In German this thing is called "Messing-Spreizdübel" and the translation into English I found so far is "brass expansion bolt" or "brass straddling dowel". On the picture you can see this fine little thing.

This brass dowel has a m5-thread and is made for drilled holes of 6 mm diameter. This is ideal in combination with an aluminum tube with an outer diameter of 8 mm and an inner diameter of 6 mm (material strength: 1 mm), like the one I used for the original Schellert Tool (link). You don't even need to glue a second smaler tube into 8 mm tube, because the brass dowel will take that part.
So all you have to do is to cut off a pice of the 8/6 mm aluminum tube with a length of about 7.5 cm. The easiest way to do this is by using a tube cutter, that makes perfectly straight cuts (look here). Then all you have to do is to put one brass dowel into each side of the tube. Be sure to push it a few mm below the edge of the aluminum tube. Otherwise the clamp-piece wouldn't fit in later.

In some cases the brass dowel is a little thicker than the inner diameter of the aluminum tube. In this case you have two options. You can widen the aluminum tube be using a drill of 6.1 or 6.2 mm. The other option, especially if you havn't got those special-sized drills is to grind down the knurled surface of the brass dowel. The easiest way to do this is to fix the brass dowel into a power drill and press it slightly onto a oiece of grinding paper while rotating. You can also use a metal file and grind down the brass tube by hand.
To fix the brass dowel into the aluminum tube you have also 2 options:
You can simply glue in the brass dowel into the aluminum handle with a good metal glue or you can fix it by using a 5 mm hexagon socket set screw like you can see on the next picture.
You can simply glue in the brass dowel into the aluminum handle with a good metal glue or you can fix it by using a 5 mm hexagon socket set screw like you can see on the next picture.


That's all. All you have to do ist to take the clamp-parts of two hobby knifes (Martor, ecobra etc…) and screw it into the tube ends.


Note: The brass dowels I use have a m5-thread. into the threads of these brass dowels you can only fit the clamp-parts of the hobby knifes that have also a m5-thread. The m5-sized screws and threads are standard in Germany where I'm from. In other countries there are other standards like "unc" in the United States for example. There are Hobby knifes available with m5-threads from Martor and Ecobra for example. I know, that other hobby knife have a UNC 10-24 thread, like x-acto, I think (I told a little bit more about this here)
So be sure to use hobby knifes with an m5 thread. You can find these knifes and also the brass dowels on google/ebay.
Saturday, February 9, 2013
Prices Of The Tools
So here are the prices of the tools and handles I will sale now. If you want to buy something or if you have a question just send an email.
- Schellert-Tool 1 mm: 45,00 €
- Schellert-Tool 2 mm: 55,00 €
- Sculpting Tool 1,5 mm: 20,00 €
- Tool Handle 1 or 2 mm: 12,00 €


- Schellert-Tool 1 mm: 45,00 €
- Schellert-Tool 2 mm: 55,00 €
- Sculpting Tool 1,5 mm: 20,00 €
- Tool Handle 1 or 2 mm: 12,00 €


Saturday, February 2, 2013
1.5 mm tool for sale
While working on the 1mm and 2mm tool tip sets I also made 10 finger/spoon tips as well as 10 sculpting knife tool tips, each made of 1.5mm steel. So this is a size between the 1.0mm and the 2.0mm tool tips. These tool tips I will fit in wood/brass handles and sell them as 10 single tools with finger/spoon- and sculpting knife tool tip. I made this combination because for me this is the tool tip combination I used most of the time while sculpting. You can see a picture of this combination on the following picture.

And on the next picture you can see a comparsion of the fingert/spoon tip and the sculpting knife tip, each shown in 1.0, 1.5 and 2.0mm.


And on the next picture you can see a comparsion of the fingert/spoon tip and the sculpting knife tip, each shown in 1.0, 1.5 and 2.0mm.

Thursday, January 31, 2013
1mm tool tips set for sale
And here is a picture of the 1mm tool tips set.
it will contain with the following tool tips:
- sculpting knife
- finger tool tip
- chisel straight
- chisel curved
.- micro knife
- needle curved
- needle straight
on the picture you can see the standard aluminum handle as well as the wooden/brass handle that will be sold separately.

it will contain with the following tool tips:
- sculpting knife
- finger tool tip
- chisel straight
- chisel curved
.- micro knife
- needle curved
- needle straight
on the picture you can see the standard aluminum handle as well as the wooden/brass handle that will be sold separately.

Tuesday, January 29, 2013
2mm tool tips set for sale
Well here's a picture of the six 2mm tool tips.
On the photo you see them fixed into a handle made from walnut and brass.
These kind of handles I will sell separately. The basic 2mm set will come with the six tool tips you see and an two sided aluminum Schellert-tool-style handle for quickly changing the tool tips. The wooden handles are ment to be used if you do not want to change the tool tips all the time.

On the photo you see them fixed into a handle made from walnut and brass.
These kind of handles I will sell separately. The basic 2mm set will come with the six tool tips you see and an two sided aluminum Schellert-tool-style handle for quickly changing the tool tips. The wooden handles are ment to be used if you do not want to change the tool tips all the time.

Monday, January 28, 2013
Tool tips are done
I've got a few emails again, asking me about the availability of the sculpting tools, I had anounced for sale quite a while ago.
I'm still working on that. The problem is that I can only work on them in my spare time and while having a real life job and a little daughter (not to mention my wife :-)), there isn't much of it. I never thought it would be such a lot of work.
But Now, I took a large step forward in this project: Last weekend I finally finished the work on the set of sculpting tool tips, I will offer for sale.
I have now forged, grinded and polished 22 sets of 2mm tool tips and 40 sets of 1mm tool tips. The 2mm-set exists of 6 different tool tips while the 1mm-set comes with 7 different tool tips.
While working on them, I discovered something interesting: To make a single set of sculpting tool tips isn't really a big deal. But making 40 of them is really something different. To make all the same moves and work steps again and again becomes quickly enervating and sets you in a state of trance :-).
Anyway, I've done them now :-)
All that's left now ist to finish the handles but I already have quite a few of them ready here. And of course I have to think about the price of the tools.
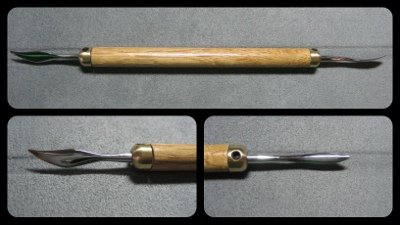
I will post some pictures of the sets during the next days. Until then here are some pictures of sculpting tools made of 3 mm steel that I've made lately.


I'm still working on that. The problem is that I can only work on them in my spare time and while having a real life job and a little daughter (not to mention my wife :-)), there isn't much of it. I never thought it would be such a lot of work.
But Now, I took a large step forward in this project: Last weekend I finally finished the work on the set of sculpting tool tips, I will offer for sale.
I have now forged, grinded and polished 22 sets of 2mm tool tips and 40 sets of 1mm tool tips. The 2mm-set exists of 6 different tool tips while the 1mm-set comes with 7 different tool tips.
While working on them, I discovered something interesting: To make a single set of sculpting tool tips isn't really a big deal. But making 40 of them is really something different. To make all the same moves and work steps again and again becomes quickly enervating and sets you in a state of trance :-).
Anyway, I've done them now :-)
All that's left now ist to finish the handles but I already have quite a few of them ready here. And of course I have to think about the price of the tools.
I will post some pictures of the sets during the next days. Until then here are some pictures of sculpting tools made of 3 mm steel that I've made lately.
Monday, September 24, 2012
Tool update
Hello again,
During the last weeks a lot of people send emails asking me about when my sculpting tools will be available for sale. Well, I'm working on it :-). What I will offer in the end will be two versions of the Schellert-tool. One with 1mm tool tips and one with 2mm tool tips. Beside that I will also offer seperate handles made of wood, brass and aluminium. I think, it's ok if you got a handle with exchangable tool tips especially when you are traveling around. But I confess that it might be a hassle if you have to change your tool tips all the time while sculpting. So I made seperate handles where you can fix the tool tips in with screws. So with the Schellert-tool and a seperate handle you'll have just two two-sided sculpting tools at the same time. In the picture below you can see some of the stuff I've already done. It's quite different to produce 20-30 tools instead of one or two and it's definitely much more work than I'd expected. If you are interested in these tools, just send me an email an I put you on my list.
 |
| sculpting-tools / work in progress |
Saturday, July 7, 2012
Back and a review of my Schellert-Tool
It's really quite a long time since I wrote my last post here in my sculpting-tool blog. Sorry for that.
At the moment I'm thinking about some new tutorials for making sculpting tools and related stuff. So I hope, you will read some new posts here soon.
I'm also working on a small bunch of Schellert-tools for sale. I already got some handles and half of he sculpting tool tips done. When all the forging, grinding and polishing is done, I will tell you more about that.
In the meantime you might want to read a review of my Schellert-Tool :-)
A very nice guy named Craig wrote this review after trying out my tools. You can find this review here: rusty boy review of the Schellert-Tool.
At the moment I'm thinking about some new tutorials for making sculpting tools and related stuff. So I hope, you will read some new posts here soon.
I'm also working on a small bunch of Schellert-tools for sale. I already got some handles and half of he sculpting tool tips done. When all the forging, grinding and polishing is done, I will tell you more about that.
In the meantime you might want to read a review of my Schellert-Tool :-)
A very nice guy named Craig wrote this review after trying out my tools. You can find this review here: rusty boy review of the Schellert-Tool.
Sunday, November 21, 2010
should I make some tools for sale?
Hi everyone,
during the last weeks, I've got several emails from people asking me, if I have some of my Schellert-tools for sale. There seems to be some interest, especially in my Schellert-tool with the small sculpting tips for very small details.
So I would like to know, if there are some more people out there that would like to buy such a tool.
Actually I didn't make this blog for selling tools, but for showing how to do it on your own. But I confess, that some tools are not as easy and fast to do at home especially if you haven't got the right tools for that. So I'm thinking about making a few pieces of the Schellert-tool with the 1mm heads if enough people are interested in.
So please tell me if you are interested :-)
Wednesday, June 9, 2010
EBOOK / PRINTVERSION - downloadlinks
Hello,
as promissed, I have updated my downloadable ebook again.
It contains all the tutorials from my blog: "make your own sculpting tools" and you can download it for free if you like.
Once again I've made several different versions:
1.
The "print"-version has the best quality if you want to print it out.
2.
The "ecoprint"-version has the same quality for print, but text and pictures are on plain white paper for saving printer ink.
3.
The "ebook"-version has a lower quality with a smaler file size and is made for reading it on the screen.
4.
And finally there is the new "epub"-version. I've made it for viewing it on Apple's iPad.
It has a browsable table of content, so you can jump right at the position you want without the need to scroll through the whole ebook. I hope, you'll like this.
Here are the downloadlinks:
1. SCULPTING_TOOLS_2010_06_09_print.pdf
2. SCULPTING_TOOLS_2010_06_09_ecoprint.pdf
3. SCULPTING_TOOLS_2010_06_09_ebook.pdf
4. SCULPTING_TOOLS_2010_06_09.epub
as promissed, I have updated my downloadable ebook again.
It contains all the tutorials from my blog: "make your own sculpting tools" and you can download it for free if you like.
Once again I've made several different versions:
1.
The "print"-version has the best quality if you want to print it out.
2.
The "ecoprint"-version has the same quality for print, but text and pictures are on plain white paper for saving printer ink.
3.
The "ebook"-version has a lower quality with a smaler file size and is made for reading it on the screen.
4.
And finally there is the new "epub"-version. I've made it for viewing it on Apple's iPad.
It has a browsable table of content, so you can jump right at the position you want without the need to scroll through the whole ebook. I hope, you'll like this.
Here are the downloadlinks:
1. SCULPTING_TOOLS_2010_06_09_print.pdf
2. SCULPTING_TOOLS_2010_06_09_ecoprint.pdf
3. SCULPTING_TOOLS_2010_06_09_ebook.pdf
4. SCULPTING_TOOLS_2010_06_09.epub
Thursday, June 3, 2010
EBOOK UPDATE / NEW EPUB-VERSION
Hi again,
I just want to inform you that the ebook version of this blog will be updated soon, so it will contain all tutorials posted in my blog again.
Because I have an iPad now, I had a look into the epub-file-format for ebooks because these can be read directly on the iPad. There are also apps like "GoodReader" that makes pdf-files readable on the iPad, but the ebub-format has some advantages.
So I'm quite proud to tell you, that beside the different pdf-versions of my ebook, there will be also an epub version that can be read with the App iBooks directly on your iPad.
Of course all versions of the ebook will be free as always.
I will post the downloadlinks for the ebooks here in my blog during the next days.
I just want to inform you that the ebook version of this blog will be updated soon, so it will contain all tutorials posted in my blog again.
Because I have an iPad now, I had a look into the epub-file-format for ebooks because these can be read directly on the iPad. There are also apps like "GoodReader" that makes pdf-files readable on the iPad, but the ebub-format has some advantages.
So I'm quite proud to tell you, that beside the different pdf-versions of my ebook, there will be also an epub version that can be read with the App iBooks directly on your iPad.
Of course all versions of the ebook will be free as always.
I will post the downloadlinks for the ebooks here in my blog during the next days.
EXPERIMENTAL TOOL: MULTI-BLADES
This time I want to share a little idea for new sculpting tools: The Multi-Blades.
In fact they are more a kind of “sculpting aid” than a real tool.
The basic idea behind that is to place some hobby knife blades side by side to each other, to they will produce exactly parallel cuts.
I call them “experimental tools”, because by now, I’m not so sure about them. So if you like, just play around with them and maybe you will get some nice results. At least, I got some :-)
Here are some examples:
While sculpting miniatures, you also have to sculpt belts and other kinds of straps sometimes. For doing this, there are basically two ways:
1.
You make a separate “belt” by flattening a piece of putty, cutting out a belt of that and fix this to your miniature.
2.
You sculpt the belt right out of the miniature without adding new putty by making two parallel cuts directly on your miniature (the putty have to be fresh of course) to form the basic shape of the belt and refine this to form a real looking belt.
Usually I prefer the first method, because in my eyes the results look better most of the times. That’s because it’s not easy to get perfectly parallel cuts right on the miniature itself, so a separate cut belt looks more convincing. But sometimes, there’s the need to form the belts and straps right out of the putty that is already placed on the miniature. That’s especially the case for very small belts and straps.
So I thought about a way to ease the way to “cutting a belt right on the miniature” and I came to the idea, to get a small knife with two parallel edges. So you have to press this knife only once into the putty and you’ll get two perfectly parallel cuts simultaneously. That’s all.
To realise this idea, you just have to get some of this blades for Hobby-knifes, like x-acto, Martor, Ecobra, pro edge etc. You don’t have to use new blades. In fact it is better to use and blunt blades for that, because it’s not good, if the edges are too sharp. Too sharp edges would cut too easily through the putty and form too sharp edges. If the blade is a little blunt, it will drag the putty a little down on each side of the cut when you press the blade into it. This helps to get the right shape.
I made two versions of this double-blade, a thin one and a very thin one :-).
1.
The first “very thin” version will do two cuts with a distance of less than a mm. So this is for very tiny straps or for cutting strands of hair!
You just need two hobby-knife blades. From one of this blade cut away the lower part of the blade that usually sits inside the knives handle. You can do this also by breaking the spare part off of the blade, but be very careful while doing that. You have to use two flat nose pliers for that to hold the blade tight while breaking it. And be sure to protect your eyes while doing that.
If you managed this, just glue the remaining part of the blade to the side of the other complete blade with good metal glue. You have to be accurate at this part to place the two edges exactly on top of each other.
On the following picture you can see the stages of creating the double blade:

You can place the finished double blade into the handle of the hobby-knife, like any other blade. That’s the reason, why you have to cut away the back part of one of the blades, because two blades wouldn’t fit into the handle at the same time. At least that’s the case with my hobby-knife handles. If you got a handle that can hold two parallel blades at the same time, you don’t have to cut away anything, just glue two blades together and you are done.
But if you haven’t got such a handle, just do it as described.
2.
Ok, the first double-blade makes quite thin belts. So I made a second version which makes a slightly broader belt/strap.
For doing this, you need three hobby-knife blades.
On two of them cut or break away the back parts just as I’ve described before.
On the third cut away the sharp edge over the whole length of the blade. Remove about two mm of the edge. Look at the following picture to see better what I mean.
Then just glue the cut blades on each side of the remaining full length blade, like explained before.
On the next picture you can see the different stages:

That’s it. If pressed into the putty, this double blade will do belts / straps that are twice as broad as those formed by the first version of the double blade.
After doing the two “Double-Blades” that I’ve described before, I just do a third version, this time a “Triple-Blade”.
The idea behind such a triple-blade is to use it for sculpting fur. You can make a series of small cuts into the putty (drag the blade out of the putty at the end of the cut) to make a nice fur structure.
The building process of this “Triple-Blade” is nearly the same as for the second “Double-Blade” except that you don’t have to cut away the edge on one of the hobby knife blades.
The next picture shows exactly, what you have to do:

If you got the idea behind that, you can easily make other multi-blades with other distances between the edges. You just have to glue “something” between the blades to form the distance and get the whole thing on a kind of handle.
Thursday, April 22, 2010
LARGER SCULPTING TOOLS
When I started this blog here, I made it about tools for sculpting in small scales like 30mm or 54mm scale. But there are also a lot of people around, who do sculpting in a quite larger scale. Especially comic-style characters are quite popular. A lot of these people do their stuff with super sculpey or super sculpey firm (grey). The height of these Marquette’s is 15 cm and above. I found this interesting and so I would like to try out some sculpting in a larger scale on my own.
For that I thought about a simple sculpting tool for getting started with larger sculpts.
I had a look on the web for tools that other people use for that kind of sculpting and decided to make my own two sided tool.
In the end it is just a two sided tool made of a stainless steel rod with 5 mm diameter and with a “finger-tip” on one end and a “sculpting-knife”-tip on the other.
I made it this way:
First I took a stainless steel rod with 5 mm diameter and cut of a piece with about 17 cm length. Maybe it’s a bit too long, so you do it just a bit shorter.
After that, I fixed the rod into an electrical drilling machine, set it into rotation and pressed it slightly onto a grinding machine, like you can see on the next picture.
By doing this, I formed a pointed tip on one end of the stainless steel stick.

After that, I just flattened the end of the stick. To do so, I heated the pointed end of the stick up until it glows and than hammered it down on an anvil. It’s just the same procedure as I’ve explained for making 1mm tool tips (look there: “the finger tool”) beside the fact, that this time the steel has a much larger diameter. The flattened end looked like that:

Then I moved to the other side of the stick. This end, I grinded down a bit as you can see on the next picture. The idea here is to give the end already the rough shape of the later blade of the sculpting knife. I use also the grinding machine to get this done. It’s better to “pre-shape” the steel that way because it saves you a lot of work later and helps you, to get the right shape.

After that, this end was also flattened with heat, hammer and anvil. Again it’s the same as I’ve explained in my post about the 1mm tool-tips for the “sculpting knife” just in a larger scale. The flattened end looks like that:

After doing the forging work, I had to refine the two ends of the tool with the grinding machine. After that, the tool looked like that:

Finally I used abrasive paper and a polishing machine to remove all scratches from the tool and to give it a clean surface. In the end it looked like you can see on the next picture.

After that, the new tool was done. As I said before, it has a diameter of 5 mm, which is ok for most hands (except troll and orc).
I made two alternative versions of the tool.
The first alternative was made of stainless steel which profile wasn’t round but hexagonal (like a screw nut). The screw-wrench size of this hexagonal steel rod was also 5mm which makes it a little larger in the hand than a round 5mm rod. Beside that some people prefer a hexagonal grip on their tools for having a better control over the tool.
If you want to use such a hexagonal steel rod, I suggest grinding down the tool ends to a round shape before forging the tool ends. This helps to flatten the ends more evenly.
The tool from the hexagonal steel rod looks like that:

For the other alternative I used a round profile stainless steel rod again, but this time smaller with a 4 mm diameter. There’s nothing special to explain here because the procedure is the same as I’ve explained for the first tool. This tool looks like that.

So the tools I’ve made by now have a diameter or “grip size” of 5mm and 4 mm.
Maybe you prefer tools with a larger diameter at least at the handle. If so, here are two ways to get a thicker handle on these tools:
1.
You can just “add” a larger diameter to this tool, by using a heat shrink tube (I hope, this is the right word in English for it).
A heat shrink tube is a tube / hose made of some kind of rubber-like material. If heat is applied on it, the diameter of this tube shrinks down. There are different kinds of heat shrink tubes around. I suggest getting those with a high shrinking ratio. I took one with a 4/1 shrinking ratio. That means, the diameter of the tube was originally 16 mm. After heating it up, it shrinks down to 4mm diameter. The shrinkage in the length direction is much less. It’s less than 10% (at least for the heat shrink tube I use).
I also choose a heat shrinking tube with hot glue already applied to the inside of the tube. This helps to fix the rubber grip very tightly to the steel.
I bought this heat shrink tube on ebay.
I cut up a piece of the tube that is just a little bit longer than I want for the final “grip”.
I just pulled it over the tools handle and applied heat on it. I used a heat gun for that like that. That’s a kind of hard-core hair dryer that produce much more heat than a usual hair dryer. I guess you need about 120 to 150 ° (Celsius) for activating the shrinkage.
While applying the heat on it the diameter of the tube starts to shrink dramatically until it sits on the metal tool very tightly (even more because of the heat glue inside the tube).
Because I choose a quite large heat shrink tube, the final diameter of the tool grip was quite large. So after that my new tool has a diameter of about 8 mm, that’s the same as the handles of hobby knifes like x-acto or Martor etc. Finally you just have to cut of a part of the tube away on each end, if it is too long. The final tool looks like that:

Here you can see the relation of the original heat shrink tube before and after heating it up:

I just made two other tools in smaller sizes that way. One is made of 4 mm steel, and one of 3.5 mm steel. For those I took heat shrink tube with the size 12/3 mm (12mm before heating / 3mm after heating).

2.
For the second version I used once again an aluminium tube as a handle.
I made this handle for the smaller tool made of 4mm steel, because this might be a bit too thin for the hands.
I took an aluminium tube with an outer diameter of 8mm and an inner diameter of 4 mm (Material strength = 2mm). I just cut off a piece of that tube with the desired handle-length and rounded up the ends. Once again I’ve done this by fixing it into the electrical power drill an hold it slightly onto an electrical grinding stone machine like I’ve explained above for giving the steel rod a pointy tip.

After that, I just cut the forged tool in the middle and glued each part into one end of the aluminium too with good metal glue.

If you want to make a lighter tool, just cut off a little more of the non-forged side of each tool tip before gluing it into the aluminium handle.
You can do just the same with a 5mm diameter tool. For that you just need an aluminium tube with an outer diameter of 8 mm and an inner diameter of 5mm (material strength = 1,5mm). If you can’t find that size, you can do it with a tube combination (a tube with outer diameter = 6mm and an inner size = 5 mm inside a tube with outer diameter = 8mm and inner diameter of 6mm).
I’ve explained that in the post about “tool handles”.
On the last pic for today, You can see all tools from this tutorial:

That’s all about my first excursion into larger tools for sculpting.
Subscribe to:
Posts (Atom)